Elasticsearch
Elasticsearch는 Apache Lucene에 구축되어 배포된 오픈소스 RESTful 검색 및 분석 엔진 입니다. 다양한 언어를 지원하고 고성능에 스키마가 없는 JSON 문서로 Elasticsearch는 다양한 로그 분석과 검색 사용 사례에 최고의 선택이 되었습니다.
환경
ubuntu 18.04
python 3.8.x
jdk 11
설치
용어 및 사전 개념
Elasticsearch 관계형 데이터베이스(RDMS) 인덱스(Index) 테이블(Table) 샤드(Shard) 파티션(Partition) 문서(Document) 행(Row) 필드(Field) 열(Column) 매핑(Mapping) 스키마(Schema) Query DSL or KQL SQL - 색인(indexing)데이터를 검색될 수 있는 구조로 변경하기 위해 원본 문서를 검색어 토큰들로 변환하여 저장하는 일련의 과정. = 색인, 색 과정
- 인덱스(index, indices)색인 과정을 거친 결과물 or 색인된 데이터가 저장되는 저장소ES에서는 도큐먼트들의 논리적인 집합을 표현하는 단위
- 검색(search)인덱스에 들어있는 검색어 토큰들을 포함하고 있는 문서를 찾아가는 과정
- 질의(query)사용자가 원하는 문서를 찾거나 집계 결과를 출력하기 위해 사용하는 검색어 or 검색 조건
- 샤드(shard)
- Index 내부에 색인된 데이터는 물리적인 공간에 여러 개의 파티션으로 나뉘어 구성되는데, 이 파티션을 Elasticsearch에서 Shard(샤드)라고 명명함
- Elasticsearch는 다수의 Shard로 데이터를 저장하고 있어 데이터 손실 위험을 최소화 하며 검색 속도를 높임
역색인
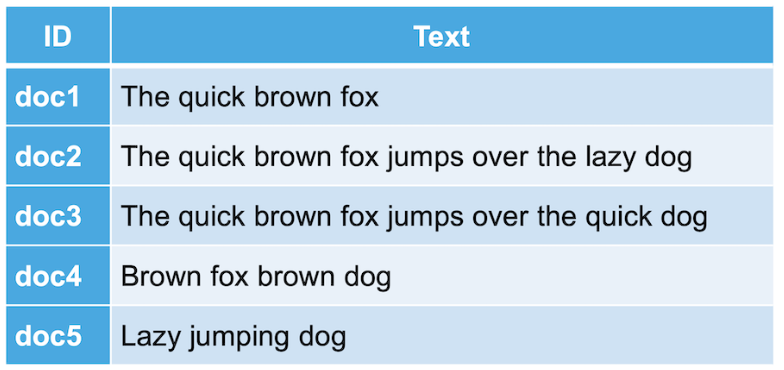
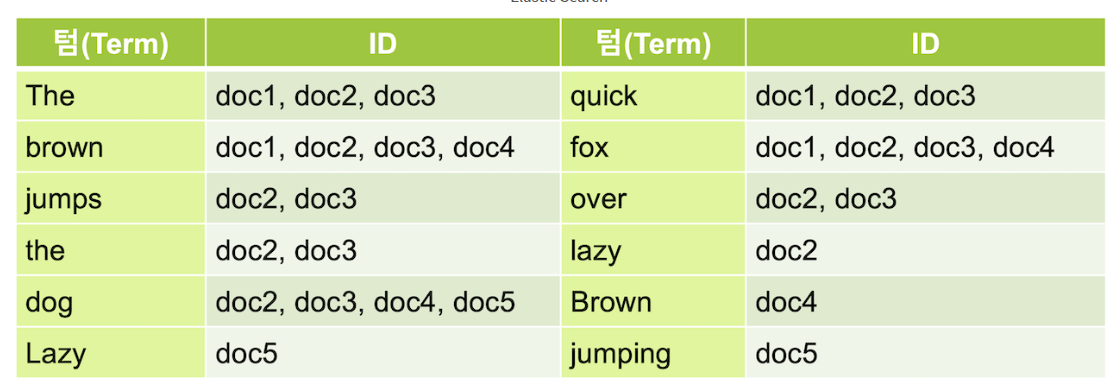
1. Lucene은 기본적으로 역파일 색인(inverted file index) 구조로 데이터를 저장하며 이를 사용하는 ES 또한 동일한 방식으로 저장하여 텍스트를 검색한다. 이런 특성을 Full text search라고 한다.
2. 내부적으로 역파일 색인일지라도 사용자 관점에서는 JSON 형식으로 데이터를 전달한다. 질의에 사용되는 쿼리문이나 쿼리에 대한 결과도 모두 JSON 형식으로 전달/반환된다.
3. key-value 형식이 아닌 문서 기반으로 되어 있으므로 복합적인 정보를 포함해도 그대로 저장이 가능하여 직관적이다.
인덱스와 샤드
인덱스 : 도큐먼트를 모아놓은 집합 (데이터 저장 단위인 인덱스는 인디시즈indices라고 표현하기도 한다.)
샤드 : 인덱스가 분리되는 단위, 루씬의 단일 검색 인스턴스. 테이블의 파티션의 개념과 유사.
복습: 데이터를 ES레 저장하는 행위는 색인, 도큐먼트의 집합 단위는 인덱스라고 칭한다.
인덱스는 샤드 단위로 분리되고 각 노드에 분산되어 저장된다. 하나의 인덱스가 5개의 샤드로 저장된 경우 다음과 같다.

샤드 중요 특징
샤드는 Primary shard 와 Replica shard 로 나뉜다.
말그대로 프라이머리 샤드는 '원조'라고 보면 되고 레플리카 샤드는 원조에서 복사해낸 '복사본'이라 생각하면 된다.
- Elasticsearch 내부적으로 Primary Shard와 Replica Shard는 같은 노드에 있지 않음
- Replica Shard끼리도 같은 노드에 할당되지 않음
- 할당 되지 않은 Replica Shard가 있을 시 Elasticsearch의 Health는 Yellow
- 할당 되지 않은 Primary Shard가 있을 시 Elasticsearch의 Health는 Red

즉, 0번 샤드 기준으로 표현해보자면 다음과 같다.

1. 이처럼 여러 노드에 인덱스를 나눈 샤드를 '복사'하는 이유는 데이터의 안정성 때문이다.
2. 주로 엘라스틱 서치는 클러스터로 구성을 하게 된다.
3. 만약 한대의 서버(노드)의 전원이 꺼지게 된다면, 다른 서버(노드)에 복사되어 있던 샤드(데이터 조각)를 살려(Primary Shard로 대신 사용) 데이터가 누락되는 사고를 막는다.
Elasticsearch 설치 및 실행
Install Elasticsearch from archive on Linux or MacOS | Elasticsearch Guide [8.5] | ElasticInstall Elasticsearch from archive on Linux or MacOSedit Elasticsearch is available as a .tar.gz archive for Linux and MacOS. This package contains both free and subscription features. Start a 30-day trial to try out all of the features. The latest stable version of Elasticsearch can be found on the Download Elasticsearch page.https://www.elastic.co/guide/en/elasticsearch/reference/current/targz.html
두가지 설치 방법이 있는데, service 등록까지 해주는 Debian 패키지를 추천 드립니다
설치방법1. tar.gz 파일 다운 및 설치
공식 문서의 절차에 따라 리눅스용 archive 다운 및 설치 하였습니다 - Elasticsearch 8.5.3
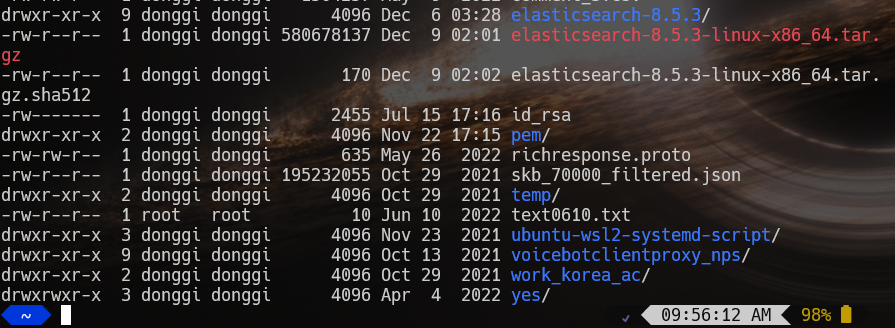
wget https://artifacts.elastic.co/downloads/elasticsearch/elasticsearch-8.5.3-linux-x86_64.tar.gz wget https://artifacts.elastic.co/downloads/elasticsearch/elasticsearch-8.5.3-linux-x86_64.tar.gz.sha512 shasum -a 512 -c elasticsearch-8.5.3-linux-x86_64.tar.gz.sha512 tar -xzf elasticsearch-8.5.3-linux-x86_64.tar.gz cd elasticsearch-8.5.3/(shasum 에 대해서는 따로 정리해 두겠습니다)
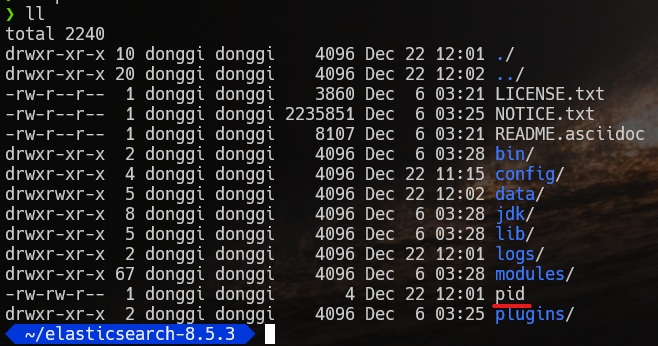
유저 디렉토리에 설치가 됐습니다

설정
설정은 elasticsearch.yml에서 가능합니다. 네트워크, 포트, 클러스터 네임, 노드 네임등을 설정 가능합니다. 수정하지 않으면 default 값으로 적용됩니다.
위치는 설치 디렉토리의 config 디렉토리 입니다.
vi ./config/elasticsearch.yml실행
설치 디렉토리의 bin 디렉토리에서 elasticsearch 를 실행합니다
./bin/elasticsearch처음으로 Elasticsearch를 시작하면 보안 기능이 기본적으로 활성화되고 구성됩니다. 다음 보안 구성이 자동으로 발생합니다
- 인증 및 권한 부여가 활성화되고, 엘라스틱 슈퍼 사용자에 대한 암호가 생성됩니다.
- TLS에 대한 인증서 및 키는 전송 및 HTTP 계층에 대해 생성되며 TLS는 이러한 키 및 인증서로 활성화되고 구성됩니다.
- 키바나에 대한 등록 토큰이 생성되며, 이 토큰은 30분 동안 유효합니다.
다음과 같은 메시지가 출력됩니다.
━━━━━━━━━━━━━━━━━━━━━━━━━━━━━━━━━━━━━━━━━━━━━━━━━━━━━━━━━━━━━━━━━━━━━━━━━━━━━━━━━━━━━━━━━━━━━━━━━━━━━━━━━━━━━━━━━━━━━━━✅ Elasticsearch security features have been automatically configured!
✅ Authentication is enabled and cluster connections are encrypted.

ℹ️  Password for the elastic user (reset with `bin/elasticsearch-reset-password -u elastic`):
[난수의 패스워드]

ℹ️  HTTP CA certificate SHA-256 fingerprint:
  5963f63455301c1dadd11164afe4c5db91b27b991b2273cd23975cdf7e2ae3ef

ℹ️  Configure Kibana to use this cluster:
• Run Kibana and click the configuration link in the terminal when Kibana starts.
• Copy the following enrollment token and paste it into Kibana in your browser (valid for the next 30 minutes):
  [난수의 패스워드]

ℹ️  Configure other nodes to join this cluster:
• On this node:
  ⁃ Create an enrollment token with `bin/elasticsearch-create-enrollment-token -s node`.
  ⁃ Uncomment the transport.host setting at the end of config/elasticsearch.yml.
  ⁃ Restart Elasticsearch.
• On other nodes:
  ⁃ Start Elasticsearch with `bin/elasticsearch --enrollment-token <token>`, using the enrollment token that you generated.
━━━━━━━━━━━━━━━━━━━━━━━━━━━━━━━━━━━━━━━━━━━━━━━━━━━━━━━━━━━━━━━━━━━━━━━━━━━━━━━━━━━━━━━━━━━━━━━━━━━━━━━━━━━━━━━━━━━━━━━
실행 확인
curl --cacert $ES_HOME/config/certs/http_ca.crt -u elastic https://localhost:9200위에서 발급 받은 elastic user password 를 요구합니다.

데몬으로 실행하기
Elasticsearch를 데몬으로 실행하려면 명령줄에서 -d 를 입력하고, -p 옵션을 사용하여 프로세스 ID를 파일에 기록합니다.
./bin/elasticsearch -d -p pidpid 파일이 생성된 것을 확인 할 수 있습니다

프로세스 번호 확인
vi pid
해당 프로세스가 실행중인지 확인
top
프로세스 죽이기
pid 파일을 통해 프로세스를 죽임
pkill -F pid
설치방법2. Debian패키지로 설치
설치과정
# Elasticsearch PGP 키 가져오기
wget -qO - https://artifacts.elastic.co/GPG-KEY-elasticsearch | sudo gpg --dearmor -o /usr/share/keyrings/elasticsearch-keyring.gpg

# 방법1 APT 저장소에서 설치
sudo apt-get install apt-transport-https
echo "deb [signed-by=/usr/share/keyrings/elasticsearch-keyring.gpg] https://artifacts.elastic.co/packages/8.x/apt stable main" | sudo tee /etc/apt/sources.list.d/elastic-8.x.list
sudo apt-get update && sudo apt-get install elasticsearch

# 방법2 Debian 패키지를 수동으로 다운로드 및 설치
wget https://artifacts.elastic.co/downloads/elasticsearch/elasticsearch-8.5.3-amd64.deb
wget https://artifacts.elastic.co/downloads/elasticsearch/elasticsearch-8.5.3-amd64.deb.sha512
shasum -a 512 -c elasticsearch-8.5.3-amd64.deb.sha512
sudo dpkg -i elasticsearch-8.5.3-amd64.deb

# Elasticsearch 실행systemd
# systemd에 서비스 등록
sudo /bin/systemctl daemon-reload
sudo /bin/systemctl enable elasticsearch.service

# 서비스 시작, 중지
sudo systemctl start elasticsearch.service # 서비스 시작
sudo systemctl stop elasticsearch.service # 서비스 중지

# 서비스 진행상황 확인 (!root 계정으로만 접속해야 함, elastic 비밀번호 필요!)
curl --cacert /etc/elasticsearch/certs/http_ca.crt -u elastic https://localhost:9200
config 정보
--------------------------- Security autoconfiguration information ------------------------------

Authentication and authorization are enabled.
TLS for the transport and HTTP layers is enabled and configured.

The generated password for the elastic built-in superuser is : [난수 password]

If this node should join an existing cluster, you can reconfigure this with
'/usr/share/elasticsearch/bin/elasticsearch-reconfigure-node --enrollment-token <token-here>'
after creating an enrollment token on your existing cluster.

You can complete the following actions at any time:

Reset the password of the elastic built-in superuser with
'/usr/share/elasticsearch/bin/elasticsearch-reset-password -u elastic'.

Generate an enrollment token for Kibana instances with
 '/usr/share/elasticsearch/bin/elasticsearch-create-enrollment-token -s kibana'.

Generate an enrollment token for Elasticsearch nodes with
'/usr/share/elasticsearch/bin/elasticsearch-create-enrollment-token -s node'.

-------------------------------------------------------------------------------------------------
연결 확인
sudo curl --cacert /etc/elasticsearch/certs/http_ca.crt -u elastic https://[hostname]:9200
모든 인덱스는 두 개의 정보 단위를 가지고 있는데 바로 settings 과 mappings 입니다.
인덱스를 처음 생성한 뒤 get()으로 조회하면 설정(settings) 그리고 매핑(mappings) 정보를 확인할 수 있습니다.
인덱스 생성
sudo curl -XPUT --cacert /etc/elasticsearch/certs/http_ca.crt -u elastic https://[hostname]:9200/create-test인덱스 확인
sudo curl -XGET --cacert /etc/elasticsearch/certs/http_ca.crt -u elastic https://[hostname]:9200/create-test{ "create-test" : { "aliases" : { }, "mappings" : { }, "settings" : { "index" : { "routing" : { "allocation" : { "include" : { "_tier_preference" : "data_content" } } }, "number_of_shards" : "1", "provided_name" : "create-test", "creation_date" : "1672642603040", "number_of_replicas" : "1", "uuid" : "nRMPRdQCSmmm", "version" : { "created" : "8050399" } } } } }
로그 확인
- 기본 로그(root 계정으로 접속 가능)
tail -f /var/log/elasticsearch/elasticsearch.log
- journalctl 사용
sudo journalctl -f
sudo journalctl --unit elasticsearch
- 기본 로그(root 계정으로 접속 가능)
비밀번호 재설정
(root 계정으로 접속해야 함)
/usr/share/elasticsearch/bin/elasticsearch-reset-password -u elastic
참고 자료
https://aws.amazon.com/ko/opensearch-service/the-elk-stack/
https://www.elastic.co/guide/en/elasticsearch/reference/8.5/targz.html#install-linux
https://alex-blog.tistory.com/entry/Elastic-search-2-개념-정리
'DB' 카테고리의 다른 글
| PostgreSQL 설치/설정/백업/복구 (4) | 2023.12.27 |
|---|---|
| mysql설치/설정 (0) | 2023.05.18 |
| 형태소 분석기 설치 (1) | 2023.01.08 |
| 엘라스틱 스택 다운,설치 (0) | 2023.01.08 |


댓글